Product Review: Deiss PRO Zester & Grater


Disclaimer: I received a free sample of this product in exchange for an honest review and to post Amazon promotional codes. I do not have my own Amazon affiliate link at this time so this post contains promotional codes that need to be entered at checkout before January 1, 2017, but this post does not contain affiliate links. All Amazon links are direct links only. The only compensation I have received for this post is the free grater.

Shortly before the biggest cake show of the year, I was asked if I would be willing to test and promote the new Deiss® PRO Citrus Lemon Zester & Cheese Grater, which is a mouthful of a title for what I’d otherwise call a microplane grater. I replied that we use microplane graters in our household all the time – primarily for Parmesan cheese, nutmeg, and zesting lemons – and that I’d be happy to give it a whirl and share discount codes with my readers, as long as I could do it after the Birmingham show.

So this thing arrived in the mail and I thought, “Yup, that’s a microplane grater, I’ll get to that in a few weeks.” Because at first glance other than the bright yellow handle, it just looks like every other microplane grater we’ve ever had, and while we ought to replace them more often than we do – because they do get dull after a few years and we really do use them a lot – shopping for a grater tends to be based on convenience and price more than features. I mean, it’s a grater, right? It’s a series of itty bitty blades that shred things. What’s to separate out one from the rest?

Well, I was surprised when I actually used it to find a really cool feature none of our other graters have had, and my husband has decided the Deiss is his new favourite as well. It’s a tiny thing that we didn’t even notice at first until I was grating up some Parmesan and realized I could put the tip of the grater down on the board and push the cheese without the grater slipping around. It was novel enough that I had my husband come take a photo of me doing it:

grating cheese

By resting the tip down on the cutting board, I was able to push the cheese against the grater firmly and get beautifully thin wisps super fast. The metal part held firm with no dangerous flexing.

This is accomplished by two little rubber feet at the end of the grater:

black rubber feet

Those two tiny black feet make a huge difference!

To contrast, here’s the Deiss (on the right) alongside our old grater, which worked fine for grating but we could never put down on its tip without it slipping under pressure:

two graters

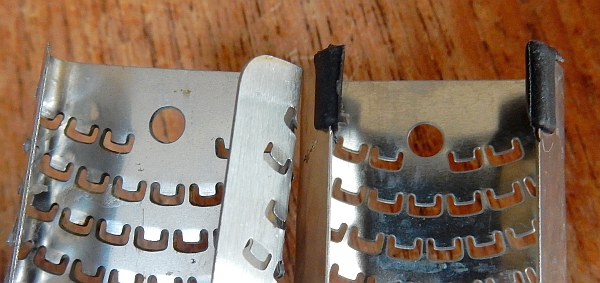
The old grater is on the left with no rubber feet, the Deiss is on the right with black rubber feet.

To get around the slipping, typically with the old grater we’d grate over a bowl. For ingredients that only need approximate measuring – such as how I grate nutmeg directly into a cookie recipe because I know it’s “about that much” and then “a bit more because I like nutmeg” – that’s still the easiest way to do it, as I did with the Deiss here:

grating nutmeg into bowl

Never buy pre-grated nutmeg. It loses its flavour quickly. Always buy whole nutmeg and grate it fresh as needed. Trust me on this…you haven’t had proper nutmeg flavour if you only buy pre-grated stuff. I’m not even being a food snob about it, I promise! I buy premade pastry crusts, pre-shredded mozzarella, and pre-chopped frozen onion and garlic. I’m not against you saving time, but nutmeg isn’t the place to do it!

But with cheese or an ingredient that needs to be measured, having to put the grater across a bowl means either using a large bowl that then needs cleaning, or using a small bowl that isn’t as stable and then you’re only using a small portion of the blades, so it takes longer. Being able to speed-grate a pile of fluffy Parmesan on a small cutting board is definitely preferable.

grated parmesan

Mmm, fluffy fresh Parmesan. If you’re going to buy pre-grated Parmesan, at least make sure it’s refrigerated and fresh. If it’s on the store shelf, it’s got other things in there to keep it from caking or growing mould, and you lose the flavour and creaminess of this glorious cheese.

I meant to make something with lemon zest in time to do this post, but because I was so ill for weeks after the Birmingham show I haven’t done enough cooking and I realized I have to get this post done now so you all have time to use the discount codes before they expire! But I can’t wait to be able to speed-zest a lemon using a cutting board like this soon. It’s more stable, too, and I can tell you from all-too-frequent experience that grating your fingers while zesting a lemon is a real test of how many swear words you can spew in a matter of seconds.

In fact it’s telling that the Deiss has not claimed its first taste of blood yet. Usually a new grater, peeler, or knife has already sampled human flesh if it’s been in our house this long. We’re really rather horribly clumsy, and now that I’m typing this I’m pretty sure the Deiss can hear me and is just waiting for me to finish posting this and then it’s going to hunt me in my sleep, but until you see an update of my demise assume that this pleasant little feature is actually helping to prevent us from putting a little bit of ourselves into every dish!

It does come with a guard that snaps on and off (a little awkwardly, to be honest…we’ve had graters where they slide on more easily than this one), but we don’t tend to hurt ourselves on things in the drawer nearly so much as grappling with slippery cheese or the ends of nutmegs.

grater and guard

The guard has holes in it. I’m not sure what for, although it’s possible that they help prevent moisture building up in there because that sometimes did happen with our old one and the slide-on guard if we put it away before it was completely dry. And all graters are a pain to dry. Really, seriously, just leave it in the drainboard overnight. And remember to wash it before you need it because if you try to grate dry things like nutmeg or even Parmesan while there’s still moisture in the holes, it all gets gummy. Don’t do that. Protip.

Anyway, all in all we’re quite pleased with the Deiss, and not just because whenever you get a new grater you realize how hard you were working with your old dull one, but because those tiny rubber feet actually do make a difference. Our household now requires that all future graters have this feature!

To get your own, here are links for Amazon.com and Amazon.co.uk. Use the corresponding code beside the link at checkout (where it asks you if you have a gift card or promotional code) to save US$1.50 or UK£1.48 until January 1, 2017.

For Amazon.com click the link below and use the code OPFL2K2X
https://www.amazon.com/Deiss-Citrus-Zester-Cheese-Grater/dp/B00WGSYA46/

For Amazon.co.uk click the link below and use the code ICM2QKR4
https://www.amazon.co.uk/Deiss®-Citrus-Zester-Cheese-Grater/dp/B00WGSYA46/

Posted in Products, Tool Reviews | Leave a comment

3D Blood/Candy Filled Gravestone Cookies


I’m up to my blood-filled eyeballs in preparation for the big Birmingham cake show, but I wrote a guest post for It Takes A Village To Raise a Mother all about how to make 3D filled cookies without the need for a special cookie cup pan as with my usual 3D cookies.

I’ve designed this project to be super-basic in terms of items you probably already have in your kitchen and with lots of options for how to work around if you don’t. So if you want a fun baking activity this weekend with your kids (or without!), have a go at these:

tombstone cookies

Some have my fake edible blood inside, some have candy, some have both!

It Takes A Village To Raise a Mother is a really great parenting support blog, so if you are feeling overwhelmed by your kids or just want to nod and smile along to some great articles about coping with little ones, check it out.

peo eating cookie

Peo says, “Happy Halloween!” Okay actually she was saying, “Om nom nom!” because she’s the one who made these cookies!

Posted in 3D Cookies, Cookies, Guest Posts, Sick and Twisted, Working With Kids | Leave a comment

Emergency Gift Chocolates


A few weeks ago in the middle of a super-busy cake time, I got invited to a friend’s birthday party. With no car and my grocery order already in for that week, I couldn’t easily go get a gift and even though it was specified that gifts weren’t necessary, I really wanted to bring at least a little something.

Luckily I remembered that the kind folks at Mister Chef had recently sent me a box of goodies for testing and review, including a little mould that happens to make gift-box-shaped edibles. (So yes, that means I got this mould for free, but as I always tell all PR people, I am always honest in reviews so you readers can be assured that I’m not just pushing products.)

I also had some cocoa butter I bought awhile back with the intention of playing with but haven’t had time, several varieties of pink glittery edible dusts accumulated from various cake show gift bags, raffles, etc. (in this case I used The Sugar Art’s Sterling Pearl Yummy Berry, so thank you to The Sugar Art for donating it to whichever show I got it from!), some ganache in the freezer (I freeze it in little chunks in a silicone ice tray I’ve had for ages so then I can pull out however much I need), and some nice chocolate in the pantry.

So I decided to throw all of that together quickly on the day of the party and make some chocolates shaped like gifts!

Step one was to make the ribbon sections of the mould a different colour so they’d stand out. This of course is completely unnecessary, but a nice extra. If you were making emergency chocolates with this mould, you could absolutely just make them all one colour. You could also pipe in some different chocolate first (ie some white chocolate if the rest will be dark, or vice versa, or a coloured candy melt). You could even decorate the chocolates after they come out of the mould, but it struck me that I’d get faster, cleaner lines by using the mould itself, so I went with it.

tools

Cocoa butter chips in the bowl, glittery pink dust, paint brush, small spatula, and the gift mould.

Although I wanted to use the cocoa butter for the most part, I decided it’d also be fun to test what happens if I just painted the dust in directly while still dry, so on two of the mould’s cavities I did that.

For the rest, I melted the cocoa butter slowly in the microwave – and I do mean slowly because it was the first time I did it and wow does it ever take a long time compared to full chocolate! But once it was a liquid, I scooped a small amount of the dust in and mixed it up. It made a pearlescent mix which pleased me because I knew it meant the final result would be glittery, which I knew the recipient would enjoy. Then I used the brush to paint the liquid into the lines of the ribbons. I learned quickly that the trick was to start at the top and let the liquid run down and cool as it went, doing this repeatedly to build up layers, because otherwise it all wanted to pool at the bottom and not stick to the super-smooth silicone (which is, of course, half the point of the silicone…to give a glassy-smooth but flexible decorating surface). If too much pooled down, I used the brush to bring it back up the side ribbons until each cavity had a good, thick layer of the tinted cocoa butter.

dust and cocoa butter in mould

The four on the left have the cocoa butter, and the two on the right have just the plain dust. I found it difficult to get the dust to apply as evenly as the liquid cocoa butter. Further, where the cocoa butter went over the edge, I was able to let it cool and pop it off fairly cleanly, whereas dust that went where I didn’t want it to (which was a lot, on account of it being literally dusty and floating around easily) really stuck on the mould and couldn’t be easily cleaned off without risking the whole piece.

Then I did a basic shell-and-fill chocolate. I carefully melted some dark chocolate to just the melting point to keep it in temper (since I’m really horrible at tempering chocolate!), then poured it in the mould all around, banged it to knock out bubbles, and inverted the mould so excess could drip out. Once that was completely hardened, I warmed up some ganache just enough to be pourable and filled each cavity with a little space left at the top. I popped the mould into the fridge, and about 20 minutes later took it back out. Then I put more melted dark chocolate over the top and gave it a scrape over the top with a larger spatula. I let that firm up again in the fridge for about half an hour to be super sure they were firm, then popped them out.

broken chocolate

Oops. I learned on the first one not to push on the middle of the gift to pop the chocolate out!

chocolates

Thankfully on the rest I figured out to push from the stronger corners and they all came out cleanly.

The two that were dusted directly into the mould are the two in the middle on the second row, and it shows. The dust doesn’t show up as well as it does when it’s embedded in the cocoa butter.

I packed them up in a box and took them to the party.

chocolates in box

Super fancy packing: plain greaseproof paper in a plain white small cake box. I did tie it shut with some curling ribbon, at least. FANCY DEPANTSI.

So I learned the following:

  • Having chocolate, frozen ganache chunks, and a gift box mould on hand means I can always whip up a party contribution without having to go shopping.
  • Mixing sparkly, edible dust into cocoa butter and painting it directly into a chocolate mould works better than dusting the mould.
  • Push from the stronger corners of a mould, not the middle!
  • People are really happy when you show up with ganache-filled chocolates.

If you’d like to order the same mould, you can do so here (not an affiliate link, but again I did get the mould free from that source for review purposes).

I am definitely planning to use some candy melts to make red, white, and green ganache-filled gift chocolates for Christmas this year!

Posted in Chocolate/Candy, Products, Tool Reviews | 1 Comment

Product Review: Marvelous Molds Ocean Line


I was going to post this originally as part of a bigger post all about how I made my recent Finding Dory collaboration cake, but Robin turned three years old recently and apparently has decided that clinging to me and whining all day is the hot new summer trend. So I’m massively behind in everything but really wanted to post about the ocean series from Marvelous Molds. I’m thus doing it now as a separate post while there’s still some summer left!

Full disclaimer: Marvelous Molds is run by one of my cake friends, Chef Dominic Palazzolo, whom I consider to be one of the most ingenious innovators in the cake world as well as one of the most generous vendors and sponsors of multiple events I’ve been involved with. I definitely biased towards loving his moulds, but it’s well-deserved bias; I’ve purchased hundreds of dollars’ worth of moulds and onlays in the past because they are top-of-the-line in quality and useful for multiple applications. He sent me the ocean line for free for promotional purposes, but I was already a fan of his other work anyway.

So there was a zero chance of me ever giving him thumbs-down on a product review because of all of that, but every bit of praise I give below is genuine because these moulds are super-detailed, easy to use, and made of high-quality, durable silicone. They even have the shell names printed along the outer edge so you don’t have to try to remember which kind is which.

The only potential downsides I can think of are a couple of them are a bit tippy when filling with a liquid (I found I had to prop them on the side of a tray as I poured in my flexible chocolate mix), and they’re pricey. These aren’t your dollar-store cartoony shell moulds. If all you need is a one-off set of simple chocolates, then sure, the cheap moulds will work well enough. But if you’re a professional making detailed beach-themed wedding cakes all summer long, you will recoup the cost of these moulds easily in the speed at which you can produce realistic-looking shells.

All that said, here’s my evaluation of the moulds using flexible chocolate, and some step-by-step photos of how I painted them. I didn’t use every mould in the set because the octopus and boat didn’t really fit the cake I was doing, but they’re all superb quality.

I made up a standard white chocolate batch of the flexible chocolate (this white chocolate has a particularly beige tint to it), poured it in the moulds laid out on a baking tray, and then popped that in the fridge for a few minutes. The shells came out beautifully with fantastic detail. This was so fast, I could easily generate enough to cover a many-tiered cake in a short amount of time.

Of course colouring them takes a bit longer. I Googled each shell to find real versions of it as colouring guides. I started out by experimenting with dabbing edible ink markers roughly down the turret shell mould based on photos such as this one, going in vertical lines.

Then I brushed some Americolor ivory gel over the whole thing, letting it collect thickly in some parts and brushing it thinner elsewhere.

colouring turret shells

From right to left, an uncoloured shell, one that’s had the edible ink marker dabbed down it, and one that has been brushed with the ivory gel.

The spongy nature of the flexible chocolate allowed me to jam the marker down between grooves. This is unique to flexible media because the shape springs back unharmed. If you try this on soft fondant or gumpaste, you’ll wreck the shape. And if you try it on fully hardened gumpaste, you get a different effect entirely:

gumpaste dabbed

A gumpaste version of the same shell dabbed with the same marker. The speckling effect is interesting as well and could be brushed out with water or more colour, but I want to make it clear that the dabbing I’m doing with the markers is going to be very different depending on what media you use in the moulds.

I made several, trying to vary the specifics of the lines but still follow the same general pattern, so they’d look like the same species but with natural variation.

turret shells

turret shell detail

A close up to show the colour but also the fine details of the ridges produced by the mould. You won’t get that on a cheap dollar store mould!

Next I looked up cockle shells (for which I have the small and large moulds) and really fell in love with the varieties that have blueish-purpleish lines, like these ones. The marker-dabbing was good for wide areas, but I wanted finer lines for these little ones so I instead used some Americolor royal blue. I painted that into the lines along a band, widened that out to the raised ridges, and then gave the whole thing a light wash of the ivory. Then I dabbed in thicker sections of ivory.

And then I tried something that worked really nicely: I lightly brushed some Americolor bright white over the ridges to highlight them, and I’m really happy with the result:

small cockle shell painting

Stages of painting the small cockle shells.

cockle shell detail

Then for variety I did a similar banding but with the ivory and a bit of Americolor warm brown on some small and large ones:

brown cockle shells

brown cockle shell detail

Once I decided that I really liked how the bright white looked, I started painting it as a more dominant colour on other shells. The lace murex shell is often very white with vertical lines, so for that one I lightly traced some ivory lines, then painted white over the whole thing in a way that blurred out those lines, and then lightly traced back over them with more ivory in a final highlight.

lace murex shell

lace murex 2

Next I painted some triton shells and spindles. Tritons come in many colours but I liked the ones here that had fairly even vertical lines (because that’s just easier to paint), and spindles come in so many varieties that I figured I could just make up what I wanted.

So for the tritons I added some Americolor warm brown and a tiny dot of Americolor super black to my palette that still had ivory and white on it, so I could blend a gray-brown mixture. I coated the whole shell in that mixture and then added the darker lines on top, blending out edges in some place and leaving them sharp in others.

For the spindles I wanted some colour variety in my overall shell bed, so I first dabbed with a red edible ink marker, and then used some watered-down white in a way that picked up a bit of the red and mixed it. Then I did a brush-tip white highlight over the whole thing.

Spindles and tritons

triton detail

spindle detail

Obviously a lot of these colour choices are completely optional. You can do as I did and look through Google images, or tailor your shells to a specified palette depending on your overall design needs.

In fact for the beaded periwinkle, I decided I wanted a lot more colour to pop through in my design, so while most of the periwinkles I found on Google only had a slightly blueish hue, I went for full-out proper periwinkle blue! I mixed the Americolor royal blue with the bright white and dabbed various gradations of the mixture all over the shells:

beaded periwinkle

You do have to be a bit careful with the white, as it can get a bit gloppy and actually minimize some of the fantastic detail that comes from these moulds.

Likewise for the sugar snail shell, I wanted a brighter set so I went for some fantasy pink tones. I definitely went a bit overboard with the thick white on these, though, and that killed too much of the detail.

sugar snail shells

For the enormous lambis shells, I painted them first all over with the bright white, then played around with other colours I had left on my palette to make a variety of stripes and highlights.

lambis shells

I made some darker and some brighter to give lots of natural variety.

After all of this, I felt confident to have a go at the mould I was really excited about: the starfish. These moulds are so detailed, it looks like real starfish come out of them. My only complaint is there should be more sizes! The one they have now is a great medium size, but I’d love to see a small one and a larger one.

I painted one starfish with red and orange and the other with orange and yellow, all blended together to give very warm tones. Then I mixed a bit of the white with the base colour for each and did a brush-tip highlight sweep. I loved how they turned out. You can really see the amazing detail on them.

starfish 1

starfish 2

I also tried putting some fondant in the coral mould and drying it on pipes to give it motion. The mould worked really well but the fondant was not great; I should have used gumpaste instead. It rained the day I was assembling the cake and the humidity pretty much melted the fondant. Still, the coral mold itself was nice, although a two-sided one would be even better for situations where you don’t want it just pressed up against a cake. The single-sided one as it is would give quick, wide-area coverage to a cake.

coral drying

When those were fully dried, I gave them a light brushing with some yellow and white mixed together, and then darkened the main veins with some super red.

I used all of the shells on my contribution to a Finding Dory collaboration as base decorations. I’ll post more about that cake separately, but here’s what the base looked like:

Finding Dory cake base

base detail

Since the moulds are primarily designed for gumpaste, I do want to show you some quick white gumpaste versions I whipped up to illustrate the detail. Flexible chocolate is poured in so it doesn’t make use of one of the great features of all Marvelous Moulds, the cutting edge. That’s so you can roll your paste right into the mould and excess will easily be cut off for you. It’s a superb feature that you won’t find on cheap moulds. The moulds’ individual pages on the store website show you videos of this in action, and it really does work quite well, especially on shallow moulds. On deeper ones, they show you on the site how to best push material in to maximize detail and minimize distortion.

gumpaste triton

Gumpaste triton shell.

end of turret shell

End of the turret shell up at the top of this post from before I dabbed the marker dots on it.

All in all I’d say if you need highly detailed, professional grade shell moulds, look to the Marvelous Moulds ocean line because they really are fantastic. I may be biased towards them, but it’s for good reason!

Posted in Cake Decorating, Experimental Techniques, Flexible Chocolate, Gummy, Products, Tool Reviews | Leave a comment

Product Review: Russian Piping Tips


A big trend going around cake decorator circles for the last six months or so has been “Russian piping tips”, which are large, multi-holed icing tips that are supposed to instantly give you all kinds of floral effects. And I do mean large: these will not fit on a standard coupler!

I decided I wanted to have a play, so I searched various websites and decided on some food-grade plastic ones I found on ebay (that’s a direct link to where I bought them, which may change in the future so search for plastic Russian piping tips, and no that is not an affiliate link or anything, I am not getting paid or compensated in any way for this review). I figured since I’m generally bad about getting around to cleaning up after rushing a cake out the door and am prone to leaving bags and tips waiting to be washed – which can leave metal tips rusty – the availability of a plastic version was a good choice to try. Being able to get 14 varieties for only £8.99 from within the UK was a great deal.

This evening I’m going to my WI craft club meeting (I am so like totes British now, all y’all) so since I had spare buttercream from a major cake I’m working on for this coming weekend, I decided to whip up an extra version of my favourite chocolate cake recipe in my 10″ pan so I could have a go with the new tips. I knew my WI friends would just be happy someone brought cake to eat, which means I could freely play with the tips for the first time without having to worry about perfection for a judge or customer.

(By which I mean my friends have made it abundantly clear they are willing to help me dispose of experimental cakes!)

My verdict is that these tips are tons of fun but do take some practice, and if like me you have hot hands that soften buttercream, you should probably pop your bag in the fridge every once in awhile. I didn’t, and you’ll see below what happened as a result.

I started with the unlevelled chocolate cake exactly as it came out of the pan, put upside down so the flatter side was showing (part of why I love this recipe is the cakes come out fairly level anyway). I cooled it for a few hours, and then got to work.

I baked the cake on a parchment circle for that nice flat bottom, but didn't level the other side at all.  I didn't cut and fill it because I knew I'd be piling buttercream thick on top and really, the point here was to have a canvas for play more than a perfect cake.

I baked the cake on a parchment circle for that nice flat bottom, but didn’t level the other side at all. I didn’t cut and fill it because I knew I’d be piling buttercream thick on top and really, the point here was to have a canvas for play more than a perfect cake.

I mixed some of the icing with Americolor Regal Purple and spread that on as a base, and then prepped three bags of multicoloured icing. I haven’t done a lot with mixed buttercream colours in one bag before, so part of this play was messing around with the colours to see what happened. The left one below has yellow (Americolor Electric Yellow) wiped around the inner lining of the bag with pink (Americolor Electric Pink) dolloped in the middle. The middle one has pink around the bag with plain, uncoloured buttercream in the middle. The right bag has blue (Americolor Royal Blue) around the outside and also plain in the middle.

piping bags ready to go

The tip patterns don’t have names, but the middle one makes rosettes and the outer ones make flowers with spiky interiors. I should name them, but knowing me the names would have to be silly ones…let’s save that for another post when I’ve tried all 14.

I also reserved some to mix as green at the end (Americolor Forest Green) to do as leaves using a standard Wilton #70 tip (which is also when I discovered that piping leaves with points is a lot harder than it looks, because I’m not sure any of mine came out with points…and again, I bet you none of the ladies at my craft group tonight will mind!).

Here was my overall result:

floral cake

A fairly garish cake but a good sampling of where the tips worked and where they didn’t. Click for a larger version.

Definitely not my usual style of cake (needs more blood), but it was fun to play and I bet everyone tonight will dig in.

So let’s get to how the tips performed:

I started with the pink and white one, which makes rosettes. My first few came out mixed, but I think I didn’t put enough white in the bag because after those they were all pink. I learned fast that it’s not 100% easy to get all of the petals – especially the interior ones – to stick to the cake, so sometimes I had to go back and re-pipe to make interior petals at all. Other times I left them a bit under done in the middle.

piped flowers

My first rosettes with good colour blending, and you can see some of the better yellow-pink ones there as well.

piped pink roses

Later rosettes came out single coloured.

Next I did a circle of the yellow and pink ones, and the dotted interiors were particularly hard to make stick on the cake. You have to really push down on that first squeeze, but if the icing is getting hot in your hand it’s easy to squoosh it out too far too fast. I got nice colour variation on these at least, and was really happy when I saw some of the outer petals come out two-toned. I just wish they’d held their shape better but again, I’ve learned to chill my buttercream more next time.

pink and yellow piped flowers

Two-toned outer petals are fun. Although you can really see in this picture how terrible I am at piping leaves! Evidence must be eaten soon!

Then I had a go with the blue bag around the side of the cake, which was definitely harder because of the angle. I think these tips work better downward. My first few flowers came out pretty nicely:

blue and white flowers

The blue exterior and white interior is really nice.

But by the time I got around the cake, the icing was way too soft and all I was getting was mushy lumps:

mushy flowers

No really, these are flowers…post-lawnmower. Yes.

With the leftover pink and yellow-pink buttercream, I tried some larger flowers in the middle. The yellow ones went all mushy, but one of the pink ones came out as a reasonably good fat rose, especially for the mere seconds it took to pipe it:

fat piped rose

I did this as an afterthought in seconds. Imagine if you used these tips with actual skill and forethought!

My overall review is that Russian piping tips make fancy flowers really fast. It took longer to colour the icing and fill the bags than it did to do the whole cake. These would be a fun way to use up all kinds of extra colours of buttercream after other cake projects, especially on cupcakes. Blort blort blort and you’re done.

And that’s just three of the tips…I haven’t even tried the other 11 yet!

I’d say if you are keen to play around with buttercream flowers in a fun, casual way, get yourself some of these tips, especially if you can find a good deal. Be aware that they take some practice and don’t expect perfection right away, but in terms of plopping together a super-fast floral cake for friends or a tea party, they’re just about perfect.

I can’t wait to play with the others. I wonder if I can talk my WI friends into having some kind of fundraiser where I’ll bring bags of icing with each tip ready to go and someone else brings some cakes and club members can pay a few pounds to come in and play with flowers and then eat cake…

Posted in Buttercream Techniques, Cake Decorating, Fancy cakes, Products | 6 Comments

Review: The Chew Cookbook


I was asked recently to review a new cookbook based on a US television show called “The Chew”, a cooking/talk show featuring Mario Batali, Carla Hall, Clinton Kelly, Daphne Oz, and Michael Symon. I warned the PR representative that I live in the UK now and have never seen the show, but that I’d be happy to review the cookbook on its own merits. He sent me a copy (disclaimer: for free) and I went through it with my family to pick some recipes we’d all like to try.

The first recipe I tried was the Chicken Potpie with Cheddar-Chive Biscuits, and unfortunately it immediately demonstrated some problems with the book. While I was preparing my grocery list using the ingredients list on the recipe, I became confused because I saw this:

broken ingredient list

I thought to myself, “I’m not sure how these are ‘cheddar-chive’ biscuits without any cheddar or chives in them.” So then I started looking at the instructions, which made reference in the second step to yogurt and milk:

full page of bad layout

Only then did I notice that under the large photo on the next page was the continuation of the ingredients list:

bad layout

I handed the book to my husband and asked, “What do you think of these ingredients for the cheddar-chive biscuits?” He looked at the list in the bottom corner, frowned, looked around the page some more, and then just like me finally realized the continuation is on the next page. He said, “That’s not good layout.”

I replied, “No, it’s not.”

I thought at first it must be an error, but this broken-ingredient-list layout occurs on several pages in the book. They’ve made a design choice to break up ingredient lists across pages.

I spent a good long time going through our massive library of other cookbooks to see if I could find any other example of a cookbook splitting ingredient lists like this, and I couldn’t. Most recipe books list ingredients first – even if the list has to span into another column – and then the methodology. Most clearly take pains to not split recipes at all, or if they must, do it in a way that at least never splits the ingredient list. Most do not even use columns because of the potential for confusing layout, and the one I found that did use columns had hardly any that went over a page and even when that happened, they split the instructions over to the next page, not the ingredient list.

America's Test Kitchen sample

This recipe in the 2012 America’s Test Kitchen TV Companion Cookbook – thus a fair comparison to this other TV-show inspired cookbook – clearly puts all of the ingredients together as one continuous list even though the instructions go on to the next page.

Cookbooks stick with this all-ingredients-together layout for a reason: it’s very frustrating to home cooks (particularly beginners) to think they have everything, start cooking, and then realize the next page has several other items that they may have forgotten to buy. Should everyone read recipes thoroughly before starting? Yes. I did, which is why I caught this problem at the shopping stage. Do all cooks do that? Nope. And for a book that has clearly been designed to be attractive with full-colour photo spreads and large photos of food, it’s very disappointing that this basic level of functionality was sacrificed.

But okay, fine, that’s just layout. What about the actual recipe?

Unfortunately, this recipe itself also caused me problems. It says to use a
“deep cast-iron skillet” so I used our 12″ Lodge cast iron skillet. I looked at the amount of liquid in the recipe and thought, “Should I be using the cast iron Dutch oven instead?” because I was worried that 6 cups of stock might not fit in the 12″ skillet, but decided that if I used the Dutch oven, the biscuits might not brown properly by being too enclosed. Plus, the directions clearly said “skillet” and if a standard Lodge pan isn’t right, I don’t even know what is. I mean this is the pan Alton Brown recommended on Good Eats all those years ago for frying chicken, and his book Gear For Your Kitchen cites a 12-inch cast-iron skillet as his primary use pan. Other recipes in the book do specify pan sizes, so I assumed the 12″ must be good enough since we also have a 10.25″ which most cast-iron users would consider to be a smaller pan. I think it’s fair to say that a 12″ Lodge is going to be what most US-based home cooks reach for if told to use a “deep cast-iron skillet” with no other measurements listed.

But no, it wasn’t big enough. As I added the ingredients, I could tell this was going to go badly. At the simmering stage instead of going for 10 minutes, I went for more like half an hour to reduce the liquid down.

full pan

This was clearly not going to accommodate the biscuits, and this was after 20 extra minutes of reducing. You can see by the time on the clock that dinner is going much later than expected at this point for a household with kids!

But as I made the biscuits, I came across a direction that said to drop heaping spoonfuls of the dough onto a floured surface. I’ve made a lot of biscuits/dumplings/etc recipes before and never seen one that called for the dough to be floured before putting it in the liquid. I thought, “Oh, okay, somehow this extra flouring will absorb the liquid and make it stay in the pan.”

Nope.

overflowing pan

The overflowing pan in the oven as the biscuits expanded.

For the life of me I have no idea what purpose dredging the biscuits served, because it’s not needed in any other recipe I’ve ever made, it didn’t help with the liquid, and it left globs of dry flour throughout the dish:

completed recipe

Those white dots aren’t just because I took this photo with my cellphone…they’re bits of unmixed, uncooked flour.

Some of the flour under the biscuits gelled up into a gooey paste, but other bits just hung around, unincorporated in any way.

serving

A serving of this dish, showing the bits of flour.

Okay, so the layout for this recipe was bad, the instructions weren’t specific enough for the pan size, and there was weirdness with the dredging part. But how did it taste in the end?

Meh.

The cheddar-chive biscuits actually were quite nice, and everyone in my family liked them. But the potpie portion itself was uninspiring, and actually unpleasant when reheated as leftovers. I’ve made many chicken pot pies of various types over the years and this – while edible – was the least liked by everyone. We all agreed that the cheapest grocery-store-brand frozen pot pies have better filling than this. The leftovers didn’t even get finished and ended up being tossed out, which is unusual in our house.

However, we all agreed that the cheddar-chive biscuits should be used for other recipe toppings in the future, or as stand-alone biscuits. We all also agreed that the dredging accomplished nothing other than leaving balls of uncooked flour around, and should be skipped.

For that reason, I’m going to skip typing out the whole recipe and instead just give you a truncated, improved version (including specifying plain yogurt since the original just said “yogurt” which could confuse beginner cooks and also specifying that the cheese should be grated, which is a bit of a “well duh” but still, recipes be specific!):

Cheddar-Chive Biscuits
 
Prep time
Cook time
Total time
 
An improved version of the recipe that appears in the cookbook The Chew. Originally on top of a chicken potpie, they could instead be put on any stew-type casserole or baked as a stand alone.
Author:
Serves: 8-10
Ingredients
  • 2 cups all purpose flour
  • 2 teaspoons baking powder
  • 2 teaspoons salt
  • 6 tablespoons (85g) butter, cut into pats
  • 1¼ cups grated cheddar cheese
  • ⅓ cup chives, chopped
  • ½ cup plain yogurt
  • 1⅓ cups milk
Method
  1. Preheat oven to 450°F.
  2. Combine flour, baking powder, and salt in a large bowl.
  3. Cut pats of butter into dry ingredients with fingertips until they resemble peas. Add the cheese and chives to the flour mixture and stir to combine.
  4. In a medium bowl, whisk together the yogurt and milk. Make a well in the dry ingredients and pour in the wet mixture. Using your hands or a wooden spoon, mix until just combined, adding more flour if necessary.
  5. Drop by heaping spoonfuls on top of a stew or pot pie liquid base and cook as per the directions of that base (original recipe said 30-35 minutes) or bake on their own until golden brown (about 10-15 minutes depending on size).


After all of that, I was honestly reluctant to try another recipe from the book, but I couldn’t resist “Burger Bread Pudding” because that just sounded delicious. And happily, it was!

burger bread pudding

This was very tasty, even as leftovers.

This recipe specifies the pan size (although I used a larger one because I didn’t have the specified size and was worried after my last experience), has everything on one page, specifies how to prep each ingredient clearly (ie grated cheese), specifies type of ingredient (ie whole milk), and turned out just fine. I definitely recommend it, although I couldn’t find potato buns here so I used regular white bread buns and it turned out perfectly fine. I also skipped the pickle garnish since decent dill pickles are very hard to find in the UK. Oh and one quibble: it says to drizzle the bread with olive oil in the instructions but olive oil isn’t listed in the ingredients. Books should not assume every cook has that at hand.

Here’s the recipe as it appears in the book except with my addition of olive oil to the ingredient list. (UPDATE: as per the comments below, I’m also updating the recipe to include when to add the bacon back in since that’s missing in the book and on the web version.)

burger bread pudding

Burger Bread Pudding
 
Prep time
Cook time
Total time
 
From the cookbook "The Chew", reprinted with permission as part of a review.
Author:
Serves: 8 servings
Ingredients
  • 4 potato buns, torn into pieces or large dice
  • olive oil, for drizzling
  • ½ pound thick-sliced bacon, medium dice
  • 1 pound ground beef
  • 1½ cups red onion, medium dice
  • 2½ cups sharp cheddar, grated
  • 6 large eggs
  • 2 cups whole milk
  • Salt and freshly ground black pepper, to taste
  • ½ cup pickles, to garnish
Method
  1. Preheat the oven to 375°F. Spray a 13x9-inch baking dish with cooking spray.
  2. Place torn bread on a sheet pan in an even layer. Drizzle with olive oil and toss to coat. Toast for 15 minutes until golden brown. Remove from the oven and place torn bread into a large mixing bowl. Set aside.
  3. In the meantime, in a large saute pan over medium-high heat, add bacon. Cook until crispy, stirring occasionally, about 5 minutes. Remove to a paper towel-lined plate and set aside.
  4. To the same pan, add the ground beef. Cook, breaking up the meat with the back of a spoon, about 5 minutes or until meat is browned.
  5. Add the red onion and cook an additional 3 minutes, until the onions begin to soften. Add the bacon. Pour the meat mixture over the toasted bread. Toss to combine.
  6. Add half of the bread and meat mixture to the prepared pan. Sprinkle 1½ cups of shredded cheese evenly over the top. Add the other half of the bread and meat mixture to the top. Top with remaining 1 cup of shredded cheese.
  7. In a large bowl, whisk together eggs and milk. Season with salt and pepper. Pour the custard over the bread and gently press down. (At this point, you may wrap the dish tightly in plastic and refrigerate overnight.)
  8. Bake, uncovered, for 30-35 minutes until golden brown. Remove from the oven and allow to set for 10 minutes for serving. Garnish with pickles on top.


So after all of that, is this a cookbook worth buying? If you love this show and would like to read profiles of the hosts, tips on entertaining in your own home, and other fun tidbits, this is a good book for you. But if you’re more into straight cookbooks, don’t watch the show, or are a beginner cook and need things explained carefully to you, I’d say this book probably isn’t for you, especially since many of the recipes appear on the website anyway. In fact I could have saved myself some time by just linking to the Burger Bread Pudding recipe on the site, but figured it was worth reprinting just in case the site takes it down. I can’t help but notice the website includes a helpful tip to bring the refrigerated version up to room temperature first, something not mentioned in the book. Also, the chicken pot pie recipe does not appear to be on the website at all.

Overall I wouldn’t buy this book unless I was getting it as a gift for a real fan of the show. It needs refinement as a proper cookbook, and appears to be more of a show book than anything else. But if you know a fan of this show, they’ll probably eat the whole thing up.

Posted in Book Reviews, Dinner, Main Dishes, Other Food, Products | 5 Comments

Easy Toddler-Friendly Popsicles


Somewhere in this still-not-fully-unpacked-and-sorted kitchen are at least three popsicle contraptions. I have a regular little plain one, a set Peo got as a really cool goodie-bag gift from a birthday party that makes rocket pops, and a set that makes highly detailed (and thus hard to release) animal pops.

England suddenly woke up last week and remembered that it can, in fact, do summer, so I’ve had Robin the backyard and wanted to whiz up some simple popsicles for her. We’ve received free samples of two kinds of vanilla yogurt from our grocery ordering company (we still do not have a car), and we judge them too sweet for regular eating so I figured they’d be perfect blitzed with some blueberries with the stick blender. I’ve seen various recipes on doing that and they mostly add honey or other sweeteners, but honestly with sweet yogurt and good quality berries (I buy mine frozen and always have some in the freezer for blueberry French toast) you do not need to add extra sugar of any sort.

But when I decided to make them, do you think I could find any of the popsicle makers? NOPE. I rooted through so many half-unpacked boxes and found other things I have been searching for (like my black ribbon that I need to go around cake boards and some flower cutters), but I just could not find those popsicle makers.

So I pulled out some of my vast stash of silicone moulds and various kinds of sticks and winged it.

I thawed about a cup-ish of berries on the counter for a few hours and then threw in some of the vanilla yogurt. I whizzed them with the stick blender. Then I dribbled some layers of just the yogurt (I really wanted to use it up before it went off) and the mix into some moulds.

First I used this matryoshka mould with regular lollipop sticks:

pink matryoshka mould

popsicle 1

Vanilla yogurt on top, pureed vanilla yogurt with blueberries below.

I still had some mix and yogurt left so I used this ice-cocktail-stick-thing mould even though I couldn’t find the sticks that go with it. But I did find some other plastic sticks and used those instead:

green popsicle maker

I over-filled these just to use the stuff up, and they came out fine. Never heard a kid complain, “Oh noes, this popsicle is too big and poorly shaped on the back end, I could not possibly eat it.”

plastic sticks

I think I got these at HEB years ago. They’re washable so they’re better than the disposable sticks, but I wasn’t sure if they were okay to be chomped on. Robin did fine and I was supervising her, but I wouldn’t give these to little kids unsupervised since they’re not made for this.

I froze them overnight and let Robin have some the next day in the yard. I think she liked them…

robin eating popsicles

Well actually these are inside the kitchen because it’s a Rule of Toddlerism that the child begs all morning to be let outside and the moment they’re out there, all they want to do is get back in. They’re on the wrong side of every door.

robin eating popsicles

I call this “Joker Face” because I am an inappropriate parent.

robin at picnic table

Robin has a really hard life with Duplo and jam and bread and blueberry yogurt popsicles out in the sunny backyard.

At the end of each disposable stick I let Robin put it in the trash because she’s very good at picking up trash when we volunteer at Anglesey Abbey. Then I caught her sticking the stick into the trash and taking it back out and licking it. Repeatedly. Toddlers are so gross, srsly, I just can’t even.

But…popsicles. Yay for easy fruity popsicles made in whatever you have on hand. Yay for random silicone moulds. Yay for summer and sunny days!

Posted in Other Food | Leave a comment

Penny Powers Cookies


A few months ago I bought Mallory Mae’s Craftsy class called “Cookies that Pop!” and ever since I’ve wanted to decorate a batch with a detailed few focal cookies in her suggested style. I don’t get a lot of free time for involved projects like that with a toddler in the house, especially with the problem of royal icing separating overnight so you can’t just set it aside and pick it up the next day.

But I also happened to know that my friend Charles Dowd who writes girl-positive comics my older daughter loves was about to release a Kickstarter for his latest project, so I asked him if I could replicate some of his art on a cookie set and he was happy to allow me to do so.

And so over a ridiculous amount of time (such that they actually got fully stale during the decorating process) I made these:

penny powers cookie set

They’re not perfect but I think they’re pretty good for a first go with this style of decorating, especially given how long it took me to get them done, and hopefully this serves as a good inspiration to others that you don’t have to be competition-perfect to have fun and play with cookie design. The yellow gave me particular problems because of separation; if I’d been using proper fresh royal icing, these would have gone much better. I can’t wait for Robin to start preschool!

Anyway, I started out by printing off a sheet Dowd gave me of the two main characters – Penny Powers and Hypercat – plus her heart symbol. I eventually decided these were too big and printed a smaller version to make templates for cutting the actual cookies, but used the larger version to make colour notations. The Craftsy course included doing two-tone skin and other shading, so I really wanted to bring out that part of the Penny Powers art as well. That does mean making a lot of bags of icing, though!

test sheet

My plan sheet, including where I rubbed test bits of colour on the white paper to compare to the promo pics of the comic to determine which colours matched most closely.

Dowd will be releasing the sheet as a freebie on the Kickstarter so you can make cookies of your own as well, so be sure to stay tuned to the Kickstarter page. Remember that the best way to track updates is to be a backer!

For these or any other custom cookies, simply print at the desired size, cover both sides of the page with clear packing tape to make it grease-proof, and cut out the shapes with enough space at the edges so icing won’t spill off. Roll out your dough (I used my regular dark chocolate rolled cookie recipe), lay your template over top, and cut around it with a sharp knife.

I also screencapped one of his promo pics and printed out the Penny Powers logo to cut out a general shape for that cookie, plus some basic hearts, rounds in various sizes, a rectangle, and some random-pointy burst shapes all to serve as secondary cookies in the set.

After baking your cookies and letting them cool fully, cut out another version of the templates into pieces so you can use a black edible ink marker on a light cookie or a scribe/needle tool on a dark cookie to trace the main elements of the design as a guide. This is covered more thoroughly in Mallory Mae’s Craftsy class, which I highly recommend.

Then mix up the icing colours you need and fill the areas almost like a paint-by-number project.

Penny Powers focal cookie

Penny has eleven different colours on her: black, two shades of brown for her hair, two shades of flesh tone, two shades of purple for the mask, red for the shoulder parts of her cape, two shades of pink for her outfit, and white for her eyes and mouth.

I used the plastic wrap trick to make lots of small amounts in the various colours in a way that will let me wash and reuse many plastic icing bags. I do them as shown in the video although I tie the back end closed. I also used couplers so I could swap out my number 1 and 2 tips as needed, because while I do have multiple of each, I don’t have enough for all of these colours.

Hypercat cookie

Hypercat has eight colours, although originally I planned more and just gave up on a few for lack of time. He’s got a main gray plus a darker gray for shading (I originally planned a light gray for highlights), red for his cape (I originally planned a dark red for shading as well), black for outline and his eyes, two shades of purple for his mask, and yellow for his medallion.

The final tally of colours I actually used and the Americolor gels I used to make them is:

  1. White (just the plain icing, although Mae recommends adding white food gel if you’re going to colour large areas white)
  2. Black (Super Black)
  3. Light brown (Warm Brown with a tiny amount of Chocolate Brown)
  4. Dark brown (above Light brown with some more Chocolate Brown added)
  5. Light Purple (Fuchsia)
  6. Dark Purple (above Light purple with a tiny amount of Super Black added)
  7. Red (Super Red)
  8. Medium Gray (tiny amount of Super Black)
  9. Dark Gray (slightly more Super Black than the Medium Gray)
  10. Yellow (Electric Yellow)
  11. Light Pink (Deep Pink plus a bit of Dusty Rose)
  12. Dark Pink (above Light Pink with a bit more Dusty Rose added)
  13. Light Flesh (tiny amount of Ivory)
  14. Dark Flesh (slightly more Ivory than the Light Flesh)
logo cookies

The logo should have had a yellow border around the purple letters and the hearts, but the yellow was flooding poorly and I didn’t feel that I had enough control to do that level of detail.

Once I’d used what was needed for the main character cookies and the logos, I played around with what was left on other shapes I’d cut for the batch. There was no particular pattern for any of the rest; I just piped some designs and words pertaining to the Penny Powers comic. Dowd told me that her catch phrase is “Holy cats!”, I’d observed some KA-POWs in the promotional material, and I figured at least one should have Hypercat’s name. I did several with Penny’s initials in various styles just to play and learn with the icing.

round cookies

Rounds with various designs and wording, including Penny’s catch phrase.

ka pow cookies

I probably should have planned the letters better so the top one didn’t have to droop to the side, but I’ve also watched enough vintage Batman to know that the letters on these things don’t need to line up perfectly.

heart logo cookie

Penny’s heart logo, done with an outer edge of leftover dark pink, red on the inside, and lined in black. You technically don’t even need a template for these since you could use any heart cutter and just trim the sides straight.

other cookies

These were my less-than-stellar experiments. In the upper left I was trying to evoke the white eyes motif on the purple background, but it looked a little weird. Then I thought I’d try doing the eye band, but it looked weird by itself so I added a mouth. But the hair isn’t right so it looks more like a little buzz-cut version of Penny. Maybe it’s some little kid mimicking her outfit? The Hypercat cookie is okay but my piped lettering isn’t perfect.

So there you have it: even though I’m fairly experienced doing cakes, I’m actually pretty new to this type of cookie and my piping skills aren’t top notch, yet I could make up a fun batch of Penny Powers cookies. This means you can too! Remember to just play around and practice. If you’re daunted by all of the colours, don’t do the shading and stick to the basic colour palette Dowd will be putting out instead. Just cut up the template, transfer it to your cookies, and fill in with icing. And if it goes all wrong, eat that evidence and nobody has to know!

Happy cookie making, and here’s to hoping the Kickstarter is a huge success!

Disclaimer: I am a contributor to the Penny Powers Kickstarter and have received no compensation from Dowd for this post, although in the past he’s included my kids in his comics. I have never received any payment from him and in fact I regularly pay him for his books. I have also paid him to do the cover art for my latest novel “Finding Gaia“.

Posted in Cake Decorating, Cookies | 4 Comments

Flexible Chocolate – AKA Chocolate Gummy


I’ve posted a huge new page all about my latest award-winning cake decorating invention: Flexible Chocolate, or Chocolate Gummy. Go check it out and learn how to turn chocolate into lace, how to braid it, and even how to knit it!

flexible chocolate promo graphic

It’s chocolate. It’s flexible. What will YOU make with it?

Posted in Cake Decorating, Experimental Techniques, Flexible Chocolate, Gummy, My Recipes, Prize Winners, Severe Nerdery | 3 Comments

Quick Tip: IKEA Knives Protect Dishes


If you’ve got a cake or pie in servingware you don’t want scratched or marked by metal utensils – like the bottom of a non-stick springform pan or a pretty ceramic pie plate – use a sturdy plastic knife to cut your baked goods instead!

If you’re a parent there’s a good chance you’ll have a set of IKEA inexpensive but strong plastic cutlery around. The knives aren’t sharp, but they do have a small toothed edge and they’re strong enough to cut through cakes and pie shells.

Clean cuts, no marks on the pie plate.  Winning at chocolate pie!

Clean cuts, no marks on the pie plate. Winning at chocolate pie!

Related Posts Plugin for WordPress, Blogger...
Posted in Quick Tip | Leave a comment