Podcast Episode 6


Featuring the hilarious Jacqui Kelly of Totally Sugar. Go to the Episode 6 page to listen and read show notes.

Posted in Podcast | Leave a comment

Episode 5 – Decorative Pies!


Head over to the show page for Episode 5 of the podcast to learn all about how awesome pies can be!

Posted in Podcast | 1 Comment

Podcast Episode 4!


On this episode Cindy Autrey and Amy Ford of Frosting Creators of San Antonio join me to talk about their recent Sugar Arts Showcase and plenty of other cake topics.

Also Mary Nicholas and Shannon Orr each called in to talk about their great experiences at the San Antonio show and Jean Schapowal has a cakefirmation to put things in perspective as you work.

[soundcloud url=”https://api.soundcloud.com/tracks/325572106″ params=”auto_play=false&hide_related=false&show_comments=true&show_user=true&show_reposts=false&visual=true” width=”100%” height=”450″ iframe=”true” /]

Please see the episode page for full show notes and music credits.

Posted in Podcast | Leave a comment

Episode 3 of the Podcast is Up!


In this episode, Kyla Myers and I talk about the San Antonio show, lots of our cake friends, all kinds of cake issues, and gush about the Cake God Mike McCarey. Then there’s a cakefirmation at the end by Mike himself.

Check it out here.

Posted in Podcast | Leave a comment

Episode 2 – May 4, 2017


In this episode, I discussed vendor experiences at cake, cookie, and baking shows, talked about how I’ll handle product disclaimers on this and future episodes, and played some interview clips from the Austin cake show featuring Mark Desgroseilliers, Sidney Galpern, Sachiko Windbiel, Denise Gall, and Tammy Colitti.

[soundcloud url=”https://api.soundcloud.com/tracks/321007066″ params=”auto_play=false&hide_related=false&show_comments=true&show_user=true&show_reposts=false&visual=true” width=”100%” height=”450″ iframe=”true” /]

Show Notes

The colour theory video featuring Artisan Accents products that Mark mentioned can be found here, and the shop he mentioned can be found here.

You can find the tool list featuring Cake Connection on my Flexible Edible Stained Glass ebook page.

The social scientist author I mentioned is Dan Ariely. He’s not involved with this podcast at all, I have simply enjoyed listening to his audio books while working on cakes in the past.

Also as mentioned on the show, I have both purchased from and received free review samples from the brands Innovative Sugarworks and Simicakes.

If you enjoyed the show, please leave a review on iTunes and share it with your friends!

Music/Sound Credits

The following songs and sound clips were used in this episode of Eat the Evidence. I am extremely grateful to creators who provide this content.

“Wallpaper” Kevin MacLeod (incompetech.com)
Licensed under Creative Commons: By Attribution 3.0 License
http://creativecommons.org/licenses/by/3.0/

“Winner Winner!” Kevin MacLeod (incompetech.com)
Licensed under Creative Commons: By Attribution 3.0 License
http://creativecommons.org/licenses/by/3.0/

“Concentration” Kevin MacLeod (incompetech.com)
Licensed under Creative Commons: By Attribution 3.0 License
http://creativecommons.org/licenses/by/3.0/

“Doobly Doo” Kevin MacLeod (incompetech.com)
Licensed under Creative Commons: By Attribution 3.0 License
http://creativecommons.org/licenses/by/3.0/

“Carpe Diem” Kevin MacLeod (incompetech.com)
Licensed under Creative Commons: By Attribution 3.0 License
http://creativecommons.org/licenses/by/3.0/

Posted in Uncategorized | Leave a comment

Popcorn Pancakes


I wanted a legitimate reason to eat popcorn for breakfast because I was craving it and feeling blerghy about trying to eat anything else. I googled around and found various ways of turning popcorn into cereal with milk but that was definitely not what I wanted, and I found some weird methods of squeezing kernels in water, but I didn’t want that either. I wanted popcorn in a pancake.

So I made some up, and it turned out really tasty. It is, however, very, very, very rich because of all the butter, so don’t expect a light and airy meal here. It makes four 6-ish-inch pancakes and I could barely eat two, whereas I usually eat about four of my regular (and much healthier) pancake recipe.

I sized this recipe to work off of a 70g bag of premade “lightly salted” popcorn. You can pop your own or use a flavoured popcorn if you like. The popcorn with sugar on it weighs more, so if the line of popcorn you like has a “lightly salted” version around 70g but the flavoured version weighs more in the same size bag, it should be fine.

Also, I ate a handful of the popcorn out of the bag as I cooked because I just assumed everyone is going to do that anyway, so really, the 70g doesn’t have to be exact!

Further, if you need this recipe to be gluten-free just ensure that all of the ingredients are gluten-free (particularly the oats and popcorn).

Note that it doesn’t come out as a pourable batter like regular pancakes, so you’ll need to put some in the pan and flatten it down:

pressing down pancake

Use your spatula to gently press it flat in the pan so it cooks through and is easy to flip.

Here’s how it looks flipped over, with a nicely crisped surface all over. No soggy weird popcorn here, just crispy popcorn pancakes!

popcorn pancake in pan

This is why we need scratch’n’sniff technology for the web.

I ate mine plain but you could add whatever toppings you like. Pour salted caramel over it and call it dessert! Or still breakfast. You’re an adult, you can choose to eat whatever suits you and I’m not going to judge. Unless you’re a kid reading this blog, in which case go pick a room in your house you’re allowed to go into, clean it, and then show your parents this page and ask for it for breakfast, with the promise that you’ll wash the dishes afterwards. That’d make me make some for my kids!

5.0 from 1 reviews
Popcorn Pancakes
 
Prep time
Cook time
Total time
 
Rich, buttery, crispy pancakes with a strong popcorn flavour. Adapt as desired using your favourite type of popcorn.
Author:
Recipe type: Breakfast
Serves: 4 6" pancakes
Ingredients
  • 57g butter (half stick, ¼ cup)
  • 100g porridge oats/quick oats (1 cup)
  • ½ tsp salt
  • 1 tsp baking powder
  • 70g bag of lightly salted popcorn (or flavour of choice)
  • 3 large eggs
  • 120 ml water (1/2 cup)
  • additional butter for frying
Method
  1. Melt the 57g of butter carefully in the microwave so it's not too hot (it can still have softened lumps in it), set aside.
  2. Place oats in a food processor and process until very fine. Transfer to a large mixing bowl and mix in salt and baking powder.
  3. Place about half of the popcorn (or less, if your processor is small) in the food processor and grind down to fine crumbs. It's okay if some chunks remain. If you see any hard kernels, remove them. Transfer to the bowl with the oats. Repeat with the rest of the popcorn until it is all ground down. Note that if your kitchen is dry, it will become highly statically charged in your food processor and try to leap out all over the place when you go to pour it. If this is a problem, put a bit of water on your fingertips and flick it into the processor's bowl, or give it a tiny misting of water from a clean, food-safe spray bottle.
  4. Break the eggs into the popcorn/oat bowl and use a silicone spatula to work the eggs into the mix, folding up from the bottom regularly to ensure all of the dry ingredients get mixed in. The mixture will be crumbly.
  5. Pour in the melted butter and mix thoroughly.
  6. Add the water and mix thoroughly.
  7. Place a knob of butter into a frying pan on medium heat until it's melted and bubbly. Scoop about a quarter of your mixture into the pan and press it down flat with a spatula. When the edges start to brown, flip the pancake with the spatula and cook on the other side until its edges are browned, then carefully remove to a serving plate. Repeat three more times for the rest of the batter.
  8. Serve hot with any toppings as desired.
Posted in Breakfast, Experimental Techniques, My Recipes, Other Food | 1 Comment

Podcast Episode 1


The first full episode of my new podcast is out!

You can listen to it and find all of the show notes here: https://www.eat-the-evidence.com/podcast/episode-1-april-20-2017/

For a full list of episodes, please see the podcast page.

If you have any comments or requests, feel free to add them below.

Happy listening!

Posted in Uncategorized | Leave a comment

Eat the Evidence is Now a Podcast Too!


Exciting news everybody…I’ve launched a podcast to go with this blog!

You can find all the details on the new Podcast page, and episodes will be listed there as well. You can also subscribe through iTunes, Stitcher, and TuneIn.

The podcast follows the same content guidelines as this blog; it’s not directly for kids, but I try to keep the language clean and promise to preface each episode with a warning if there is content I wouldn’t want my own kids to hear. So it should be safe to listen to with your kids nearby.

The Pilot Episode is out and I’m already working on the first main episode. I aim to have episodes out every other week for the first while, and then maybe once my youngest child is in full-time school I’ll be able to move to weekly. You can listen now by clicking the link below:

[soundcloud url=”https://api.soundcloud.com/tracks/314944815″ params=”auto_play=false&hide_related=false&show_comments=true&show_user=true&show_reposts=false&visual=true” width=”100%” height=”450″ iframe=”true” /]

Enjoy and get in touch to be part of the show!

Posted in Uncategorized | Leave a comment

Safety Lights Are For Dudes – Experimenting Holztmann Style


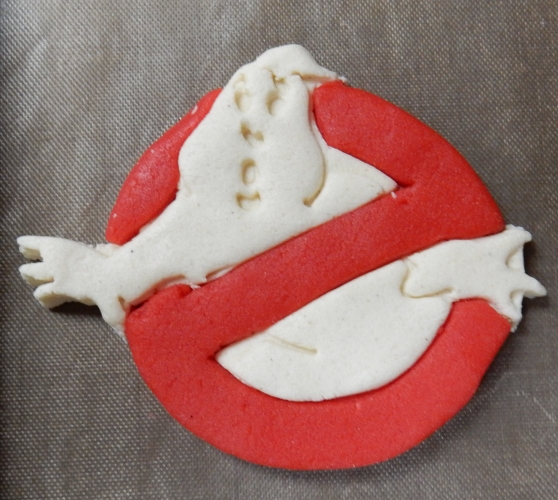
I bought a Ghostbusters logo cutter from Etsy awhile back. Recently when my friends and I were going to watch the 2016 movie together, I decided that was an excuse to run some random experiments:

Question 1: can you put white food colouring in buttery cookie dough to make it come out more white or will it just be slightly less yellow?

Question 2: can you use an inner-stamp-style cutter plus a knife to effectively have a patchwork-style cutter for cookies?

Question 3: if yes to 2, is it feasible for many cookies or is it horribly tedious?

For the first question, I knew from experience that you can add colour to cookie dough but that there’s often a yellowish tinge. For instance, light blue tends to come out fairly turquoise. So I wasn’t sure if the white (I used Americolor Bright White gel) would carry itself enough against the yellow or if baking would just make it turn golden-brown anyway.

I made a batch of what’s become my usual UK non-spreading cookie dough and separated it into thirds, tinting one white and another with Americolor Super Red. I started with a small amount and kneaded it in, repeating until I liked the result:

coloured dough

White-tinted dough on the left, uncoloured in the middle, red on the right.

Clearly the white made the dough itself very white compared to the yellow untinted stuff! That was promising…

I then rolled it out and cut several white and red logos. I put the white ones on the lined pan directly. Then, using a small, sharp knife, I cut the circle and diagonal out of the white ones and cut the ghost out of the red ones (taking care in that case to keep the long zig zag intact). Then I assembled them right on the baking tray, pushing the sides up against each other but not doing any particular pinching or adhering beyond that.

preparing the pieces 1

It was easiest to start with the ghost’s top half in place, put the little bit of red above his shoulder, put the zig zag in place but opened at the bottom, slide the ghost’s lower half into place, and then close the bottom of the circle up around him.

assembly 2

assembly 3

assembled cookie

The finished assembled cookie, ready for baking.

By assembling directly on the tray, you don’t have to move it, meaning you can let it bake together and not have to fiddle with making the pieces stick together or hold the round shape for a transfer from work surface to tray.

And I’ve got some pretty cool stuff cookin’ up over here if you just want to turn your heads…

baked cookie

The baked cookie!

Woot woot, it worked! It all baked together into one solid cookie, and other than mild browning at the small fingery bits, it stayed pretty white!

Here’s a comparison of several white ones with a no-colour one in the middle:

undyed in middle

You can see what a clear difference the white food gel made.

Although given my theme to this post, this is probably a better version of that image:

cookies with wig and hat

The hat is too much, right? Is it the wig or the hat?

So here are the answers:

Question 1: YES you can add white food colouring (at least Americolor Bright White) to cookie dough, it makes it much whiter, and it even stays white in baking (except for the actual browned edges).

Question 2: YES you can use an interior-stamp-type cutter to do multicoloured cookies patchwork style, as long as you’re prepared to sit there and cut the bits out individually.

Question 3: YES it is horribly tedious. I knew there were about four to eight people coming to this event and I wanted an extra for Peo, so I made 12 and then I was seriously sick of the picky little cutting. If you’re considering doing this sort of thing for cookies for sale, CHARGE ACCORDINGLY because it’s time-consuming and fiddly and annoying. If the cutter did the inner part all the way through it wouldn’t be too bad, but the delicate hand-cutting part is slow, achy work.

But in the end everyone loved the cookies and you know Holtzmann would have eaten them too, particularly if something horrible was happening across the room. And she’d want you to eat them so your blood sugar doesn’t get too low and you end up getting possessed. These are some of the many reasons why we love her, salty parabolas and all.

holtzmann winking

Posted in Cake Decorating, Cookies, Experimental Techniques, Severe Nerdery | Leave a comment

Cake Balls Fight Food Waste


Disclaimer: this post includes use of a tool I received free in exchange for featuring it in a project. This post does not include any affiliate links.

I’m very much involved lately with my local Women’s Institute group, the Cambridge Ladybirds, and we’ve been looking for ways to take action on the national WI resolution against food waste. To that end, we had a little friendly competition at our January meeting to make something out of leftovers currently in our pantries, fridges, and freezers.

When this idea came up at our committee meeting I said, “Guys, I make cakes. You do understand that at ANY GIVEN TIME I can use those rules to make cake balls, right?”

Because as most cake decorators know, carving cakes results in a lot of cake scraps, often mixed with icing. While there are some people who throw that out, thrifty decorators know better! We put those scraps in ziplock bags or in tubs in our freezers, and the next time we need to make cake balls or cake pops, we have the stuff we need right there at hand.

I also usually have extra ganache frozen in little square chunks on hand as well, because if I have cream that needs using soon it’s relatively easy for me to mix it up with chocolate and freeze it in my old Wilton “brownie bites” silicone pan (which I’ve never used for making brownies but is a good small square mould!).

So it was an easy decision for me to make cakeballs for the competition, especially since I had leftover yellow fondant from the cake I made for our group’s Christmas party:

cheese shaped cake

There’s a running joke about last year’s Christmas party having “so much cheese” so I made a cheese-shaped cake with some of the group’s members represented as mice.

But covering cake calls with fondant can be tricky. It’s easier to dip them in melted chocolate, so I had to think about how I wanted to do the fondant cover in a way that wouldn’t give people too much of a lump of pleated-together fondant to bite.

Then I remembered that I still had a couple of products left to review from the box of free samples sent to me by Mister Chef, including this 15 Cavity Mini Flowers Non Stick Silicone Baking Mould (they don’t have a photo on their store site at the time of this post, but they do have one on their Amazon UK store here). When they first sent me the mould I wasn’t sure what to do with it since I’m generally not a fan of shaped baking moulds as they rarely turn out with good detail on baked goods. Or even if they do, the details get lost if you put any icing on it.

But the mould turned out to be a great way to make shaped cake balls. I dusted the mould with corn starch and rolled out some of the fondant to about 2-3 mm thick; thin enough to not be overwhelming, but still thick enough to allow some stretch so I could push it down into the mould while avoiding pleats.

starting out

I didn’t measure the thickness of the fondant; I went by what felt right. That’s something that can only come with practice. I’d never done this particular application before and it took me a couple of goes to get it so it wasn’t tearing as I pushed it in. Be brave and give it a go…you’re not committing to it until you actually put the cake ball stuff in, so go ahead and try, fail, wad it up and try again. And remember, if it all goes badly you can always just eat the evidence!

The trick to getting the fondant in there without pleating is to drape it loosely over the hole and then gently nudge it down in, pulling out pleats as they form at the top which feeds more material downwards. Just like when you’re covering a cake with fondant, you need to resist the urge to pinch pleats together and instead gently pull them out. This will slowly form a cup shape that drops into place and then at the very end you can push the fondant into the mould. Don’t worry about pushing it too firmly, though, because pushing the cake ball material on it later will help finish that job.

putting fondant in mould 1

Drape the fondant over and guide it in with gravity helping you.

putting fondant in mould 2

As pleats form, gently pull them open and keep feeding the excess downwards.

Once you’re happy with the fondant’s placement in the mould, carefully trim the excess from the top. Make sure you don’t go down into the cavity at all or else you’ll end up with a gap. If you trim it and end with a little gap, pinch up some more fondant to level it off.

Next, place some cake ball mix into the hole. On my first attempt I put in too much, possibly because the entire time I was doing this I had a hungry-eyed audience…

Robin looking at cakeball

“What do you mean I can’t trim the excess with my teeth? What is this ‘hygiene’ you speak of? I call it OPPRESSION.”

Put small amounts in at a time, pushing them firmly down to the bottom but not too hard. You don’t want to push the cake ball material through the fondant down there, but you want to fill it up firmly. Fill it to the point of being level.

To cap it off, it’s easiest if you can find a circle cutter that matches the diameter of the top of the mould. I went through my Ateco graduated set until I found the closest one that was slightly over versus slightly under. You want to err on the side of slightly over in this case because you can work a tiny bit of excess into the top part, but if you don’t have enough to cover, cake ball mix will fall out.

testing cutter

Testing the cutter against the actual mould.

Then simply roll out a bit more fondant, use the cutter you chose, brush a bit of water around the edge of one side, and put that wet edge against the cake ball in the mould. Gently push it down on all sides to get it stuck firmly on.

Pull the sides of the mould to loosen the cake ball, then turn the mould over and let gravity help you get it out. If you need to push, do so carefully and evenly so you don’t distort it as it comes out. If you put enough corn starch in, it should slide out fairly easily.

cake ball out of mould

This is how my first attempt looked when it slid out.

cake ball smoothed

This is how it looked when I brushed off the excess corn starch and ran my palms around the seam edge to smooth it out a bit.

cut cake ball

Then I cut it in half to ensure there was a nice ratio of fondant to cake ball mixture.

Robin eating cake ball

See? She isn’t all that deprived after all!

Once I was sure the method had worked, I went into production-mode. I rolled out more fondant at a time, cut it with a larger circle cutter, filled each cavity, and then went back to trim.

Some tips for trimming excess in any kind of mould: 1) Obviously don’t use a sharp knife on a delicate mould, and whatever knife you use, be super careful or you could wreck your mould. If you’re inexperienced, use a plastic knife. 2) Go from the middle outwards to avoid pulling your material out of the mould as you cut (especially with less-sharp knives).

cutting excess 1

Start in the middle and cut to one side so you’re pushing your material against the mould, not pulling it out.

cutting excess 2

Then reverse the knife and cut the other way. Some shapes may require you do this multiple times from more angles. Just go carefully so you don’t damage your mould, and always sweeping towards the outside of the cavity.

I made a lot of cake balls pretty quickly once I got into it, and then decided they were a bit plain being all one colour. So I airbrushed them with a bit of red hoping to bring out the flower’s details, but then they kind of looked like nasty boils. So then I went back over the red with metallic gold airbrush spray and that made them look shiny and nice. I also added some long-ago leftover red sugar pearls I bought for Rudolph noses.

floral cake balls

Floral cake balls, all lined up for serving.

So there you have it! There are lots of shaped mini pans/moulds available on the market, so if like me you’ve thought they wouldn’t be so useful because icing ends up obscuring the detail, try instead using the pan to shape the icing!

Oh, and I won two of the three titles from the contest that inspired this whole thing: Best Tasting and Best Presented. Woohoo for cake balls reducing food waste!

Related Posts Plugin for WordPress, Blogger...
Posted in Cake Balls, Cake Decorating, Prize Winners, Products, Tool Reviews | 1 Comment