Or as my friends back in Canada call today, “Happy Thursday!” Either way, it’s always a good day for amusingly decorated cake!
Last year I donated two large turkey cakes and four mini ones to my daughter’s school bake sale. They were sold by bidding, and in the end the small ones went for $20 each and the big ones $30 each for a total of $140.
This year, I decided to do only one big one and to make the little ones more individualized with cute costumes. I figured that might make people want specific ones more and help drive up the price (this is for the school’s benefit, after all) and give me an excuse to highlight some creative ways folks can build on the pattern in my inexpensive and beginner-friendly ebook and personalize them for holiday tables.
So here’s what I took this year:

The large one in back beside a pirate, and then the front from left to right: surgeon, scientist, artist, composer, and mime.
The tally? A whopping $321 dollars! The big one netted $100 and the rest were as follows: $50 for the pirate, $35 for the surgeon, $30 for the scientist, $50 for the artist, $30 for the composer, and $26 for the mime.
Just think about what that kind of money could mean to your school, or how much individualized turkeys would mean to your family! And even if you’re too new to fondant or sculpting to shoot for these intermediate/advanced versions, a bunch of normal basic turkeys would still impress. I know this post is already on Thanksgiving, but if you’re looking for a fun family craft this weekend, grab the ebook, sit down with the kids to play with your food, and then you’ll be all ready to whip up some of these next year!
Keep reading for descriptions of how to make each variant, for free, to help inspire your creativity. In any case where you want the turkey to be holding an object in their wing, make sure you have that object ready before you form the wing so you can mount the wing, then tuck the object in while the tip is still flexible.
The Pirate
Originally I planned to do a lot more with this guy. I was going to give him a treasure chest, a sword, and more. But he was actually the last one I completed near 3 am, so I bailed. Given the vigorous bidding for him at the sale – all the way up to $50 – I think I did okay as is.

Apparently, simple sells well.
To make this, first add a white shirt by rolling out white fondant fairly thin. Cut a strip of the right height to match your turkey’s neck, and longer than you need. Wet the neck lightly where you want the fondant to stick and place one end of the white strip on the side of the neck, then wrap around to the other side. Trim to fit, tucking in the sides as you go. Use a sharp knife to slice the neckline and fold down the corners (if they break, no biggie, just stick them back on with some water). Because we all know, pirates always have open shirts.
For the ruffles, cut a long thin strip of white fondant and wet both sides lightly. This will make it sticky and hard to handle, but if you’re quick you can gently fold it back and forth into a ruffle. Pinch one side to flare it out, then affix it to the white shirt with the pinched side to the inside. Make the shirt as puffy as you like.
The patch is very easy: just roll out a bit of black, cut a patch shape (a U on the bottom, flat top) and stick it over an eye. Roll out a long thin snake of black and wrap it around the head, starting on one corner of the patch and ending on the other, trimming as necessary.

This is an easy, basic hat. You could also make a tri-corner or other style with plumes or whatever you wish. Put on some dreadlocks with beads and a bandana and you can have a Captain Jack turkey like this monkey I made in 2011.
For the hat, make a black rectangle. Pinch down the sides to make the shape shown, using a toothpick or other similar blunt took to emphasize the corners between the wide parts and middle. Use a sharp knife to cut a slit along the top. Flare those edges out so they get a bit rounded, then fold them back together. Wet and affix to the head (make sure your neck/head is pretty dry and solid or at least anchored first). Use white gel food colour to paint on a skull and crossbones motif.
The map is also fairly basic and easy: roughly marble together some white, yellow, and orange fondant, then roll it out thin. Cut a rectangle, then use a fine brush and black food colouring to draw a little map with an X.
The Surgeon
For this guy, I wanted an obvious doctor look but something that still captured the essence of the turkey, so I made the cap shaped as though it was going over the comb.

I had a partial fail on this one insofar as a lot of kids thought it was a football player because of the shape of the mask. And probably because I live in Texas.
Some of these turkeys are entirely the basic form with other stuff added. For the surgeon, though, when you make the legs leave the feet off at first, ending the orange legs at the ankle. Then make white feet and put them in place, and cover the seam with a small roll of white. That’s right: what looks like a feature is actually a cheat. I love it when that happens!
Next, mix up some green for the scrubs. It’s probably a mint green in this case, but I didn’t have that colour, so I used hunter green, electric blue, and electric yellow gel colours in tiny amounts. Make a sheet to wrap around as a shirt as with the pirate above, but don’t cut a collar. Then cut another rectangle big enough to cover the beak for the mask. Wet it and affix it in place, leaving the top and bottom edges off of the beak.
Use more of that green to shape and place a fattened version of the comb as described in the basic pattern ebook.
Roll a very thin, long white bit of fondant. Cut two smaller bits from that and put them on the sides of the mask. Then run one long bit from the crest down around the bottom of the mask and up around the other side. Do likewise for the top of the mask. Make a tiny little bow (not really tied: you just make two crossed loops with the tails hanging down) to cover up the seams of the white ropes.

The bow is technically optional, but it really hides some ugly seams under there and gives it an impressive bit of detail.
For the x-ray, roll out a bit of black fondant, cut a rectangle, and use white food gel colour to paint on a rough little ribcage. Tuck that under one of the wing tips as shown, or alternatively put it in front as with the pirate’s map above.
The Scientist
The head of the science department for my daughter’s school snagged this one, and remarked on how just the simple Erlenmeyer and test tube really give it that overall science look.

While planning this I had the thought that it’d be nice to be able to simply evoke a female scientist, but it really is this Einstein hair that sells it. If I’d gone for a Marie Curie look, nobody would have recognized that. Plus, only males have snoods.
Add a white labcoat similar to the pirate shirt above, but instead of ruffles, just make a shallow indentation down the front. Add a tiny white pocket (similar to the pirate’s patch) with some coloured “pens” inside.
I wanted the hair to be similar to the standard comb but still come out looking like the crazy scientist hair. So I used the basic technique for the comb, but instead made a block bigger out of grey, split it into more and longer segments, and placed it on the head at an angle, then repeated on the other side.

The Erlenmeyer flask doesn’t need to be fancy, but if you wanted to, you could paint tiny little measurement marks on it.
To make the flask, roll a little cone shape, then gently pinch out the top so it forms a straight bit. To make the lip, roll it gently along the blunt edge of a knife, a toothpick, or similar sculpting tool. Likewise for the test tube: just roll a tube and make the lip the same way.
The Artist
As with the pirate, I originally had more intended for this one: I was going to have paint splotches around and a smock or apron on him. But also as with the pirate, this one fetched top dollar without those extras so I guess there’s no need to overdo it.

You don’t have to include the comb under the beret, but it does help tilt it and give this guy a bit of a stylish hairdo.
For this one, make the comb as usual but then fold it over to one side. Make a round black shape and pinch out the edges slightly to form the beret, then mount that on top of the comb, to the side. Add a tiny bump on the top.

Once again, simple rules the day.
The paintbrush is simply a tapered tube with a hole poked in the wide end. Make bristles by forming a little triangle shape and jamming the pointy end into that hole. Tap a few times with a sharp knife to suggest individual bristles, and then dab with gel food colouring.

If you don’t want to make the palette, you could also make a painting similar to the pirate’s map above and tuck it under there or put it by a leg.
Make the palette by forming an oval, cutting a chunk out of one side, and smoothing those cut edges with your finger. Use a small ball tool to make the cavities, and paint some with gel colour, letting it drip around.
The Composer
Even though I modelled this after Mozart’s portrait, I didn’t intend for it to specifically look like Mozart (despite rewatching Amadeus this week and playing some Mozart as I write this blog post). But that’s what everyone at the bake sale automatically called this turkey. I even considered adding gold detail on the collar but thought that’d it make it look too much like Mozart. Apparently iconography works on the most basic level.

For the record, I keep accidentally typing “composter” as I write this post. I have no plans to make a composting turkey cake because ew. However, it’s indicative of the other sorts of blog posts I’ve been writing lately for those of you familiar with EcoSnark. And that’s about all I can say on that while remaining family friendly!
Place a thin white collar around the top of the neck, and then follow the directions above for the pirate’s shirt using some red, lining it up just below the top edge of the collar, and instead of folding the corners down to make a collar, just remove them. Make a series of ruffles similar to the pirate ones, except don’t pinch one side. Tuck them into the red shirt.
(Aside: yes, it has just occurred to me that a fleet of Redshirt turkeys would be hilariously wrong and awesome. Maybe next year.)
Make a wide, flat disc of white and arrange it on the head for the wig. Then roll a long thin white bit and cut it into four even lengths to mount on the bottom of the wig for the curls.

My Australian husband said without the music sheet, he thought this was supposed to be a barrister. Then he realized that almost nobody else here in Texas would think that. He was right.
For the music sheet, roll out some white, cut a rectangle, and paint some music on it. It doesn’t have to be fancy: anything that has groups of 5 lines and some dots with sticks will do.

The quill is easy, but optional. If you wanted to get fancy, you could instead make a little instrument and tuck it under there.
The quill is a tapered tube with the sides on the wide end squished flat. Take a sharp knife to it on an angle to make the bits of feather. Paint the very tip with black food gel.
The Mime
This one didn’t turn out so well. I was going for a classic mime makeup job and black and white striped shirt, but hardly anyone knew what this was. Most of the kids thought it was a zebra turkey, and a few adults thought it was a jail bird, which is much more clever than I meant to be. It’s telling that it went for only $1 above the base bid of $25 that was set by the school for all of them. But it also goes to show an important theme of this blog: even a failure can be a success because someone ate this evidence!

Because a mime is a terrible thing to waste.
This one is also the closest to the basic instructions, just with some colours changed. The neck and head are white instead of brown, the comb and beak are black, and the snood is white. Then I painted on the makeup, rolled some black strips for stripes on the neck, decided that was too much of a hassle, and painted on stripes for the legs and wings which were also made in white instead of their usual colours.
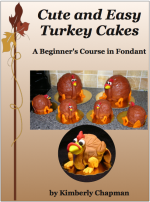
Again, these are all variations based on the easy beginner-level cakes shown in this 21-page ebook for only $4.99:
I’ve also made a Rainbow Turkey. With these basic instructions, you can let your imagination run wild and make some fun treats this holiday with your friends and family!


